
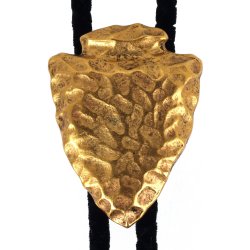
Bolo ties, also known as bola ties, are a classic western accessory one around the neck by both men and women. It consists of a leather string or plaited cord with ornamental metal clips on the ends held by a decorative brooch.
Bolo brushes frequently are of silver and decorated using precious stones such as turquoise. Native American jewelry, bolo tie, is known for its beautiful stones and silver accessories. At Rocky Mountain Western, you will find great Bolo materials such as bolo cord and strings to make your own bolo ties. You can wear it with a brooch firm up against your collar or a little lower for achieving an informal style.
If you are tired of the conventional bolo ties, you can create them on your own. Let's walk you through the steps of creating DIY bolo ties.
Materials you need for DIY Bolo ties:
- Scissors
- Dry clothes
- Damp clothes
- Pliers
- File
- Jewelry glue
- Ornamental stone
- Bolo slider
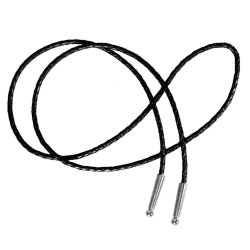
- Bolo tie cord or string
- Bolo Tips
Step 1: Start by selecting a section of braided cord. It should be approximately 4 mm thick and 40 inches long. Now, put the piece around your neck and check that both ends are set equally upon your chest. If the tie appears to be shorter, consider cutting the piece to achieve a comfortable length.
Step 2: Measure the bowler slide. Take one of the strings of the bolo tie cord And put it through one catch in the bolo slide. If the cord appears too large, consider taking the pliers and expanding the opening of the slide. Take the string and place it aside.
Step 3: Using a metal file, even out the borders of the bolo slide to stop the cord from damaging. After leveling the bolo slide, clean it using a wet cloth, then wipe using a clean and dry cloth. Use the damp cloth to polish the back part of the stone that you have selected for your tie. Consider cleaning it twice using dry clothes. Next, apply glue on the stone, attach it to the Bolo slide and let it dry. It is necessary to use high-quality glue to allow the stone to stick properly to the bolo slide. Hot gun glue dries immediately but it can be bulky if not used correctly. No matter the type of glue you use, make sure to always be careful.
Step 4: After ensuring that the stone is properly attached to the bolo slide, ease the braided cord through two catches in the back of the slide. Use the pliers to tighten the slide catches around the cord. Make sure the cord moves but not too easily. The court should be taut enough so that it doesn't slip down.
Step 5: Attach the Bolo Tips by placing a tiny amount of glue within the cord tips and then place the cord ends into the tips using pliers. Make sure the glue is completely dry before you wear it.
If you are looking forward to creating your own Bolo ties, get in touch with us to find amazing Bolo ties string, bolo tie cords, and other bolo tie supplies.
